How to Fix a Leaking Gate Valve in Main Line Efficiently?

Time:2026-06-13 Author:Liam
0%

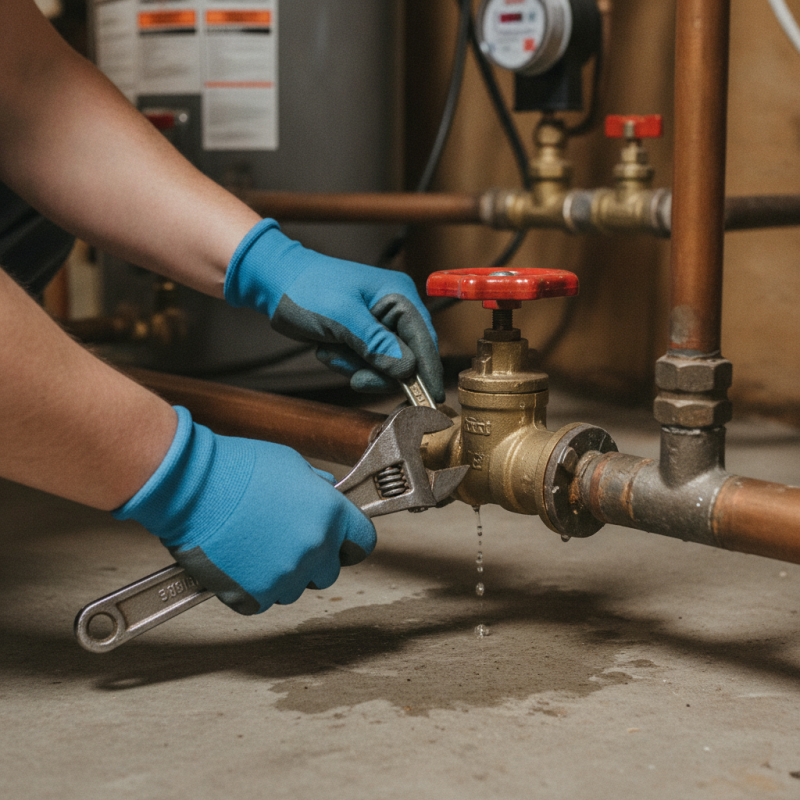
Leaking gate valves in main lines can cause significant disruptions and costly repairs. Understanding how to repair a leaking gate valve in a main line is crucial for both maintenance professionals and homeowners. According to John Smith, a plumbing expert with over 20 years of experience, "Proper techniques can save time and resources when dealing with leaks."

When a gate valve leaks, identifying the source is essential. Often, the seat or packing may be worn out. Replacing these components isn’t overly complicated, but it requires precision. Many may underestimate the importance of shutting off the main water supply. This step is critical to avoid water wastage and further complications.

Addressing a leaking valve can be daunting. However, knowing how to repair a leaking gate valve in a main line empowers homeowners. It builds confidence in handling plumbing issues. Mistakes can happen, and it’s important to analyze what went wrong during repairs. With experience, one can refine their techniques, ensuring more reliable fixes in the future.

How to Fix a Leaking Gate Valve in Main Line Efficiently?

Understanding the Basics of Gate Valve and Its Common Leakage Issues

Gate valves are critical components in many plumbing and industrial applications. They serve to control the flow of liquid through pipes. These valves can face common issues that lead to leakage. A study by the American Society of Mechanical Engineers (ASME) indicates that approximately 30% of valve failures are due to improper sealing. This highlights the importance of understanding leak causes.

Common leakage issues often stem from wear and tear on valve seats or packing. Over time, these parts can degrade, especially under high pressure. A report by the American Water Works Association (AWWA) states that about 60% of gate valve failures are linked to these wear points. Regular maintenance can help identify and prevent these problems before they become severe.

While some may consider gate valves reliable, they do require periodic checks. Ignoring potential issues can lead to bigger problems down the line. For instance, when leakage starts, it can escalate quickly. This emphasizes the need for proactive measures in valve maintenance and repair. Awareness of these facts can lead to better management and extending the lifespan of gate valves.

Identifying the Source of Leakage in a Gate Valve

Identifying the source of leakage in a gate valve requires careful inspection. Start by checking the valve body and the connections. Look for visible signs of water. Corrosion or mineral buildup can indicate a problem. If you notice water pooling around the valve, it is a clear sign of leakage.

Sometimes, the valve seat may wear out. When this happens, the valve cannot seal properly. Inspect the seals and packing materials. They might need replacement. If the valve operates under high pressure, it can exacerbate leaks. Therefore, always consider the operating conditions when assessing valve performance.

Tips: Always shut off water before starting any inspection. This prevents further damage or flooding. Use a flashlight for better visibility in dark areas. Small leaks can often be fixed without replacing the entire valve. Regular maintenance checks can help identify issues early. If you’re unsure, seek professional assistance.

Step-by-Step Guide to Disassembling the Gate Valve for Inspection

When dealing with a leaking gate valve, inspection is crucial. Disassembling the valve can reveal common issues. About 30% of valve leaks stem from worn seals or seats. Understanding this can help in prioritizing where to look.

Start by turning off the water supply to avoid flooding. Use a wrench to loosen the gland nut. Remember, excessive force can damage the valve further. Remove the stem assembly carefully. Look for scratches or debris, as these can interfere with the sealing process.

Professional reports suggest that routine inspections can prevent 70% of unexpected valve failures. During inspection, focus on both the internal and external parts. Clean the components thoroughly. Sometimes, a simple cleaning can resolve leaks. However, if you find significant damage, replacement might be necessary. Always assess the integrity of the valve before reassembly.

Repair Techniques for Faulty Seals and Gaskets in Gate Valves

When dealing with a leaking gate valve, faulty seals and gaskets often cause the issue. A worn-out gasket can lead to fluid seeping out. Assess the condition of the valve. Look for signs of wear and tear. If the gasket appears brittle or damaged, it’s time for replacement. Carefully remove the old gasket and inspect the surface. Ensure there are no lingering debris or scratches.

For seal repairs, proper sealing material is crucial. You might choose rubber or PTFE. Cut the new gasket to fit snugly. Accurate measurements are vital. If it does not fit well, leaks could persist. After installing the new gasket, tighten the valve appropriately. Don’t over-torque. This can cause further damage. Test the valve by running water through it, checking for leaks.

Take a moment to reflect on the entire process. Mistakes happen; it’s part of learning. Sometimes, a quick fix won’t last. Consider consulting a professional if leaks continue. Their expertise can save time and prevent bigger issues down the line.

Leakage Causes in Gate Valves

Reassembling and Testing the Gate Valve After Repairs

Reassembling a gate valve after repairs can seem daunting. Start by ensuring that you clean all the components thoroughly. Any debris left inside can cause future leaks. Make sure the valve body and seat are free from grime. Use cloths that do not leave lint behind. It’s essential to check the condition of the seals and gaskets. Replace any worn parts before putting everything back together.

Once reassembled, the testing phase is critical. Turn the valve slowly to observe any leaks. This step can be nerve-wracking. If water seeps out, it indicates a problem. Don’t hesitate to disassemble and correct the issue. Ensure that all components fit tightly together. Pay attention to how the valve operates. A stiff or unresponsive handle can signal a misalignment.

Tips: Use gentle force when tightening bolts. Over-tightening can damage the valve. Always have backup parts on hand for future repairs. Regular maintenance checks will prolong the life of your gate valve. Remember, a thorough inspection is always wise. It’s better to be cautious than to face leaks again.

How to Fix a Leaking Gate Valve in Main Line Efficiently?

Step Description Tools Required Estimated Time
1 Shut off the water supply to the main line. Wrench 5 minutes
2 Remove the gate valve from the main line. Wrench, Bucket 10 minutes
3 Inspect the valve for damage and clean any debris. Cleaning Brush, Cloth 15 minutes
4 Replace seals or gaskets if necessary. Replacement Seals, Knife 20 minutes
5 Reassemble the valve and connect it back to the main line. Wrench 15 minutes
6 Turn on the water supply and check for leaks. None 10 minutes

FAQS

: What are gate valves used for?

: Gate valves control the flow of liquids in pipes. They are common in plumbing and industrial applications.

What causes common leakage issues in gate valves?

Leakage stems from wear on valve seats or packing. High pressure can accelerate this wear.

How often should gate valves be maintained?

Regular maintenance checks are essential. Ignoring them can lead to more significant problems.

What should I do if my valve is leaking?

Assess the valve for worn seals or gaskets. Replace damaged parts to stop leaks.

How can I replace a worn gasket?

Remove the old gasket, inspect surfaces, and cut a new one accurately. Ensure a snug fit.

Why is testing important after repairs?

Testing confirms repairs were successful. Observe for leaks to ensure everything operates correctly.

What if the valve still leaks after I fix it?

Reflect on the repair process. Consider consulting a professional for further assistance.

How do I clean components before reassembly?

Thoroughly clean all parts, ensuring no debris remains. Use lint-free cloths for best results.

What should I avoid when tightening bolts?

Do not over-tighten bolts, as this can damage the valve. Use gentle force instead.

What can indicate a misaligned valve handle?

A stiff or unresponsive handle may signal misalignment. This requires prompt correction during reassembly.

Conclusion

In the article "How to Fix a Leaking Gate Valve in Main Line Efficiently?", we explore essential aspects of gate valves and the common issues that lead to leaks. Understanding the structure of gate valves is crucial, as it helps in identifying the source of the leakage, which can often be traced back to faulty seals or gaskets.

The article provides a comprehensive step-by-step guide on how to repair a leaking gate valve in a main line, starting with the disassembly process for thorough inspection. Various repair techniques are discussed to effectively address the issue of faulty seals and gaskets. Finally, the reassembly and testing procedures ensure that the valve functions properly after repairs, ensuring a reliable and efficient solution to the leakage problem.

Liam

Liam

Liam is a dedicated marketing professional with a profound expertise in the industry, where he excels at highlighting the unique advantages of our core products. With a keen understanding of market trends and consumer needs, Liam frequently updates our company’s professional blog, providing......